| Official Gadgeteer Hands On
Review: TRG's SP II-XL 8mb Board by Julie Strietelmeier Last date revised: 03/25/99 |
If you are a Pilot freak like I am, you just bought a brand new Palm III and have already filled the 2meg of RAM. What will you do now that you don't have room for more DOC files, memos, or heaven forbid, Quest adventures?! You do the only thing you can do: have a garage sale, mortgage your home, or sell your car and then buy the TRG's SP II-XL 8meg RAM - 2meg FLASH board! Seriously though, the board is expensive at $300... that's about the price you paid for the PDA itself. But, if you are a power user it is well worth it. One especially great feature is the ability to put some 3rd party apps, DOC type files, and databases that don't change into Flash memory. This gives you around 1meg of extra space beyond the 8meg and eliminates the possibility that you will have to reload your apps after a crash. Check here for a list of flash compatible programs.
Note: This review is based on upgrading a Palm III from a Win95 machine.
On a stock Palm III, the info screen shows a total of 1952K of total memory available for programs. At the time of my upgrade, I only had 97k left.
The first step that I did (that isn't mentioned in the instructions) was backup my Palm III. I used DB Explorer to set the back up bit on all my apps and databases.
The SP II-XL comes with an instruction sheet, and a floppy disk. The first thing you do is run SETUP.EXE from the floppy. The setup program will only run under Win95 or WinNT. A DOS version is available by contacting TRG.
The first thing that the setup program does is install a trgflash.prc onto your Pilot. This program actually extracts the ROM image from the PDA and saves it to your desktop. This operation takes several minutes. Once it's finished, you are instructed to remove the existing memory board from your Pilot. There are step by step instructions for both a PalmPilot and a Palm III.
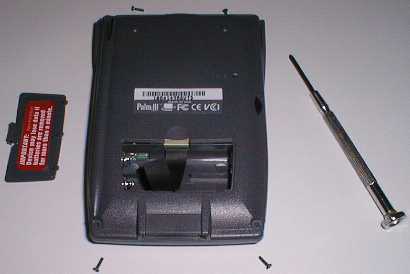
First you remove the batteries. I noticed that the written instructions tell you to remove one battery...but the onscreen instructions tell you to remove both. I removed both. You will then need a very small philips screw driver to remove the 4 screws that hold the back of the Palm III together.
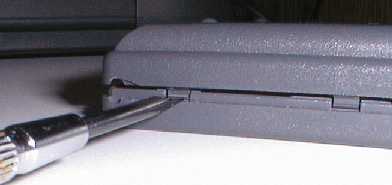
Once the screws are removed, you just can't lift the back shell off. It is actually attached to the front shell by 3 clips. This was the only 'scary' part of the whole installation. Prying around on plastic things makes me a bit queasy. I'm always afraid I'll either mar or break something. The secret is to get a small flat bladed screw driver and press in on one of the clips. By doing this, I only had to press on one clip and the whole side of the shell popped open.
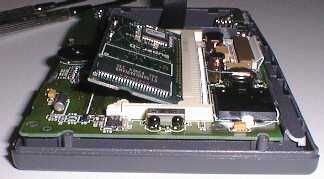
After the back shell is popped open, gently remove it from the front half exposing the circuit board.
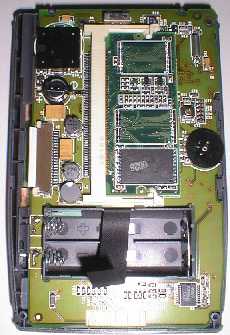
You can see the memory board laying vertically on the main board. It's held in place by 2 rounded white plastic clips on either side of the board. To remove it, you just need to use your fingernail to pry the clip away from the board enough so that the board pops up. Then just pull out the board.
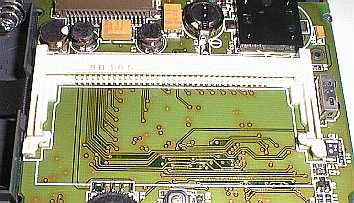 Empty memory slot
Then you just get the new memory board, slide it into the connector at an angle (see below) and then press it flat until the 2 clips snap in place.
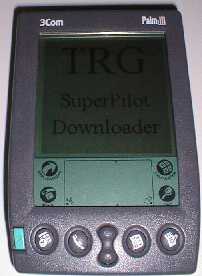
Once the board is in place, you put the batteries back in and press the reset button. If you see the same screen below, everything worked fine and you can put the back shell back on. Note: Don't forget the screws! (I did)
After the unit is back together, you continue with the setup program. You put the Palm III back in the cradle and the setup program uploads the ROM image to the new memory card. This takes several minutes after which your PDA is reset and then you're finished! The whole process probably takes less than 30mins (including the download and upload of the ROM image). The setup program is very nice because it explains ever step as you go along.
Once I had finished the installation, I hotsynced all my apps and data. This took about 20mins or so for almost 2meg that I had backed up. Subsequent regular hotsyncs seemed to take the normal amount of time. After hotsyncing, I turned on the unit and started tapping around. First I went to the Info app to see 8096k as the total memory! But with all that memory do you pay a speed price? You can tell that the system is just a little bit slower. The only place where I really notice this is when I tap the application button while inside a program. It seems to take a full second to display the icons. This is the only place where I do notice a slowness. Actually the system seems to be faster with some of my apps. I have 2yrs worth of checking acct. data in my MoneyManager program (Stingersoft) and when this program first starts it recalculates the totals. Usually it seems like it takes forever.... I think it's at least 10% faster now. I don't know if I'm imagining this or not :-)
Since I've only had the board installed for about 2 hrs, I really don't have any battery usage data to report. I'll update this review in a couple of weeks after I can better report on it.
In summary, I'd have to say that this is a terrific upgrade to your Pilot or Palm III. It's easy to install and leaves you with oodles and oodles of free space! If you've got the bucks, buy the board... Ok, now let's see what new .prcs can I download now? Off to Pilotgear I go! :-)
Price: $300.00 (TRG will give you up to $100 to trade in old TRG boards)
Pros:
It gives you mucho space!
Easy installation.
Ability to put some apps and/or databases in Flash memory.
Cons:
High price.
No MAC version of setup program.
| Let me know your comments
on the SP II-XL. Read what others have to say about this product on the Owners Comment Page |