| Gadgeteer Hands
On Review : Destinator Personal Navigation System for Pocket PC (Installed
in Vehicle with ProClip System) by Judie Hughes Date: 04/11/2003 Let us know your comments on this review and read what others have to say. |
Product Requirements:
PC with a Pentium processor (90MHz or
faster), Microsoft Windows 95 or a later version of Windows, 32MB RAM, 4x or
faster CD-ROM drive
Device:
Mobile Pocket PC Device, 32MB RAM and a 96MB
external memory card or 64MB RAM
It wasn't long ago that I was posting a diary entry telling how I wanted my next vehicle to have a factory installed GPS system. An interesting discussion ensued, both on the Gadgeteer BB and in my private e-mail. I had just bought my SUV about 6 months before I decided that GPS was a necessity, so it wasn't exactly practical to trade my Ford Expedition in anytime soon. More realistically, I needed to find an after-market GPS solution. Since I just so happened to have an IPAQ 5455 that wasn't getting daily use, I knew that a Pocket PC based scenario would be the ideal set-up for me.
I have to admit that before I began writing this review, I had zero experience with GPS navigation. While I can be pretty handy with an atlas and I have never been afraid to ask for directions, the next logical step had just never occurred. Enter the Destinator Personal Navigation System.
Believe it or not, Julie just happened to have an unopened Destinator sitting at her house; it was something that she had requested for review, but hadn't gotten to yet. After hearing how cool I thought it would be to have GPS in my vehicle, she decided to kill two birds with one stone: she got me to write the review, and she made my day. Pretty cool, huh? ☺
When I received the Destinator package, I was a little bit surprised at it's simplicity. It turned out to be a matter of installing some software and maps, then just plugging the cables in. Hey, anyone could do this!
Inside the box was a small black GPS antenna receiver with attached cables, a cigarette lighter adapter/charger with attached cables, as well as the CD-ROM which contained the Destinator software, NAVTECH� maps detailed to the house level, embedded points of interest (POI) in the maps, a user manual and a tutorial. There was also a canvas drawstring sack for storing the system when I wasn't using it, so of course - I use it for something else entirely. Unfortunately, there was no method included for mounting or holding my iPAQ when I was using the system in my SUV.
Although I have access to various vehicle mounting systems, I wanted one that was as professional in appearance and as integrated as possible - all things considered. Checking the Accessories and Complementary Products portion of the Buy Destinator page, revealed a picture of an integrated solution and a link to Proclip USA. Here, I found exactly what I would need to complete my GPS installation! Entering my vehicle's year, make and model, I found a cradle that would hold my iPAQ while integrating the charger/interface cable of the Destinator system. Another search revealed a clip that would hold the cradle in one of two places: either to the side of the AC vent or to the side of my center console. I chose the clip for the vent, as I wanted the system to be where either my passenger or I could easily hear or glance at it.
Now, before I go any further with this review, I will mention that it isn't safe to drive while playing with your GPS. Most are adults here, and I assume that we all know this. With that said, one of the ProClip's features that impressed me the most was that the cradle holding your Pocket PC will actually swivel so that your passenger can easily be your navigator if you are traveling somewhere tricky. Of course, the Navigator will also call out turns for you - so that also helps you keep your eyes on the road and your head where it needs to be when you are traveling alone.
Since I would have to wait at least a week before I had the ProClip system, and since I already had the Destinator and the iPAQ - I figured that in the interim I should go ahead and set it all up. So, popping the included CD-ROM in my laptop, I was greeted with this screen allowing me to begin...
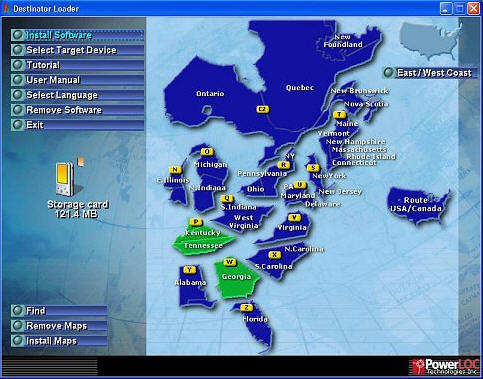
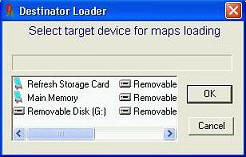
Installing the Destinator software and maps was quick - and I was really thankful that I already had a 512MB Compact Flash card and Silver Slider 3 that I could use with my iPAQ. The Loader was able to tell me my available storage locations...
Previously, I had emptied my iPAQ of everything but my Contacts, and I had also installed a 128MB SD card. When I ran the Destinator program, it easily found both of my cards and the empty memory in my iPAQ - but after transferring a couple of maps via iPAQ in cradle, I realized that it would be a lot faster to use my Keyspan Media Reader, instead. Picking the maps to install was a matter of clicking the buttons of the ones I wanted, up to the limit of the memory card I was filling at the time.
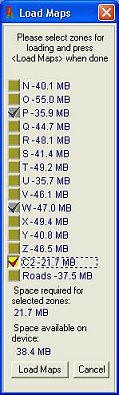
I probably loaded more maps than I will most likely need - but I always like to be over-prepared.
With my maps installed, I couldn't help myself; I had to go test out the GPS in my driveway. Never mind that I didn't yet have a cradle, never mind that I wasn't actually going anywhere - I just wanted to see it work...and after plugging in the power adapter, putting the GPS module on my dash, and after attaching the charger/interface cable - it did. I was looking at my home/position laid out in a map grid with street names and everything. Honestly, this was a true Zen moment.
But since I still didn't have a way to mount my Destinator enabled iPAQ properly, I reluctantly put everything away.
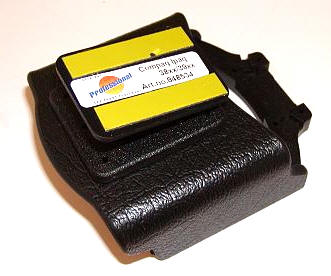
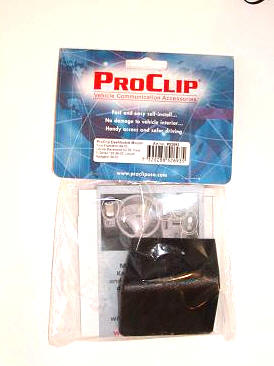
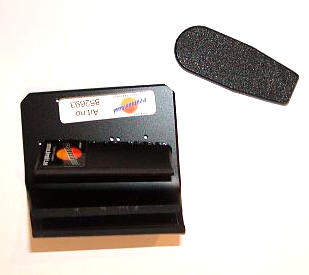
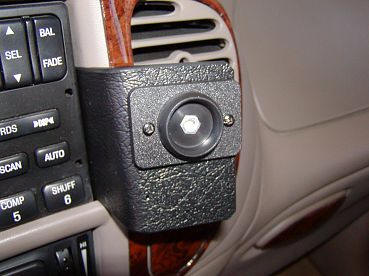
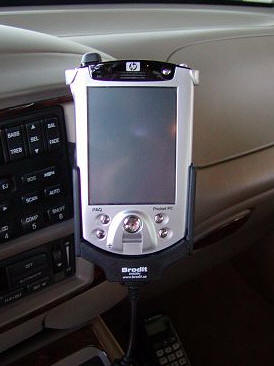
About a week later, I received the ProClip system in the mail. For those of you that drive a Ford Expedition, these are the part numbers for the items that I ordered: 848534 - the Compaq iPAQ 3800/3900 (and 5400, might I add) holder with tilt swivel, and 852693 - the vent clip for 1999-2002 Expeditions. If you drive a different vehicle or use a different PDA, your cradle and mount will most likely look a little bit different.
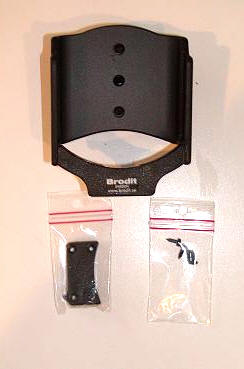
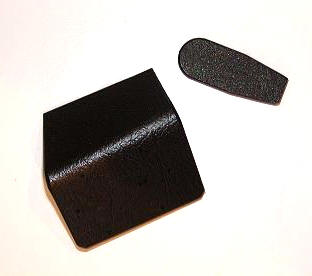
This is the tilt/swivel mounting cradle package, which included the cradle itself, a bracket to enclose the Destinator's charger/interface cable, two very important and very tiny plastic t-bar thingies (for lack of a better description), and two screws.

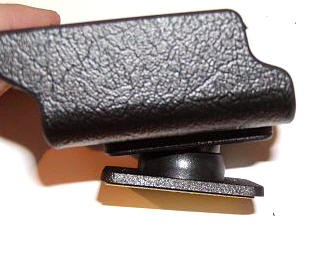
The mounting kit included a bracket that would fit between my stereo and AC vent, and a pry-tool for squeezing the bracket into such a tight spot...
Since I now had everything I needed to become GPS enabled, I gathered up all of
my goodies including a set of screwdrivers, went outside and got to work.
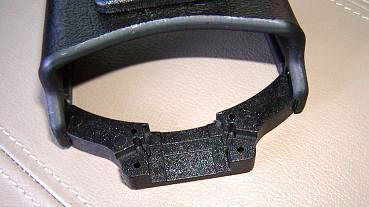
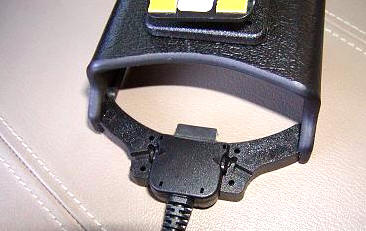
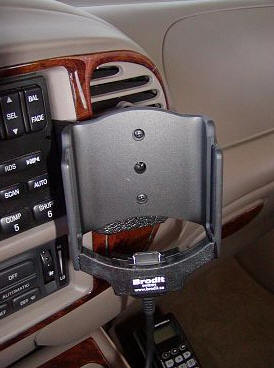
The first order of business was to attach the charging/interface cable to the cradle. I quickly figured out which way the cable would need to face so that the iPAQ would properly attach, then laid it in the cradle and attached the cover-plate. But I forgot something! In my haste, I didn't put the little t-bar "thingies" in, which meant that once I installed my iPAQ it would be installed for life. While that might be acceptable for some, I knew there would be times when I would need to remove my iPAQ, so I had to back up and install the t-bars. They keep the sides of the iPAQ plug compressed at all times so that while the iPAQ will sit securely in the cradle, you can easily slide it in and out of place.
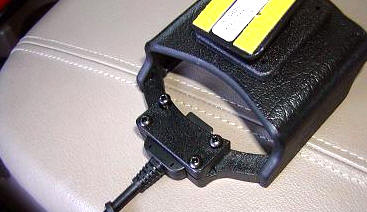
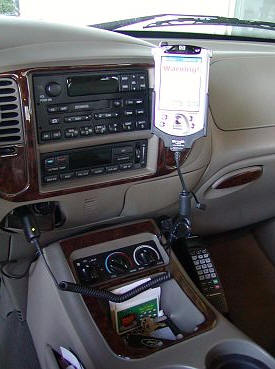
With the cradle ready, I next needed to install the mounting bracket. Using the pry-tool, I was able to jimmy the plate in between the vent and my stereo. Next, I unscrewed the swivel portion of the cradle (the big middle screw) and used the two smaller screws to attach that plate to the mounting bracket. Once that was firmly attached, I reattached the swivel base to the cradle.

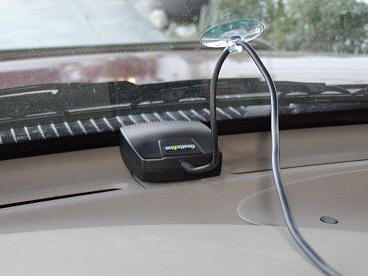
Next, I put the Destinator GPS module on my dash, and attached the suction cup that would keep it from sliding anywhere...
I plugged the power/charging cord into my lighter, installed my iPAQ, and Viola - my home/position, in all its mapped glory!
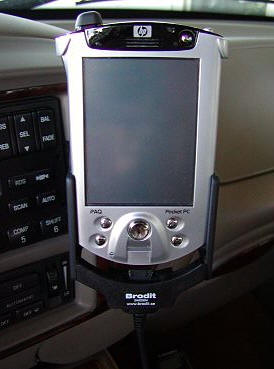
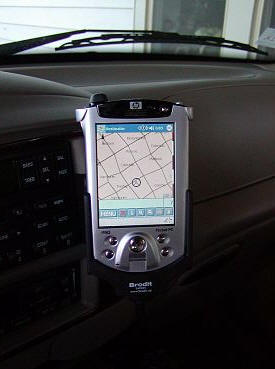
Granted, this is not a factory in-dash system, but I think it looks pretty good for what it is!
After the installation, all that remained was to actually try out the system...
For those of you that are as clueless as I was, I am going to give you a short-course on what GPS is, and how it works. For those of you that are well-versed in this subject, take a moment and talk amongst yourselves...
The first GPS (Global Positioning System) satellite was launched in the late 1970s for military use only. This allowed better navigation and better weapons aiming. Like all cool gadgets, it wasn't long before civilians heard about the technology, and they wanted it for their own personal and recreational use. The first consumer products showed up in the 1980s, and in 1984, President Ronald Reagan declared that a portion of GPS satellites capabilities would be made available to the civilian market. You can read a bit more about GPS history here.
It would be best if I now quote from an excellent article that I found on the history of GPS, published on the New Mexico Institute of Mining and Technology's web site, to explain the following: "Each of the GPS satellites transmits radio signals. GPS receivers pick up these signals and measure the distance to a satellite by multiplying the speed of the signal by the time it takes the signal to get there. The speed of the signal is the speed of light and the time is encoded within the signal. The satellites also send information on their exact location.
In order to find longitude, latitude, and altitude, four satellites are needed. If a measurement is taken using just one satellite, then all that is known is that the receiver is on the surface of a sphere with radius equal to the distance to the satellite. If two satellites are used, then the receiver must be on the surface of both spheres which is the intersection of the two spheres or the perimeter of a circle. If a third satellite is used, then the location of the user is narrowed down to the two points where the three spheres intersect. Three measurements are enough for land receivers since the lower of the two points would be selected. But when in the air or space, four satellites are needed: the intersection of all four spheres will be the receiver's location. When more than four satellites are used, greater accuracy can be achieved."
That should give you an overview of GPS, now let's talk about the Destinator Navigation System in particular...
According to the Destinator FAQ, their product is the best because: "Destinator� is a fully featured GPS navigation system. As opposed to other GPS mapping systems, Destinator� tells you not only where you are, but also how to reach your destination in the most efficient manner. Secondly, the cost is lower than most dedicated in vehicle navigation systems. Destinator�'s advanced navigation algorithms and superior map-processing technology makes Destinator a true car navigation system with features rivaling and surpassing those of permanently installed systems at a fraction of the cost. With Destinator�, you do not need to pay any additional monthly charges or fees. Third, it is very portable. Destinator� can easily be moved from one vehicle to another. Fourth, your PDA or laptop will now provide you with all the functionality of a Pocket PC PDA or laptop in addition to the navigation capabilities. Fifth, Destinator� uses the highest quality maps provided by Navigation Technologies. These are the same maps used by FedEx, OnStar, Mercedes-Benz, Lexus, Jaguar and Porsche just to name a few. Finally, proprietary patented compression technology puts a larger area of the country onto the PDA at one time, than is possible with any other product."
All of this sounded great to me - now for the road test!
The first screen you see when you power up Destinator (other than the one where you enter your activation code) is the following...
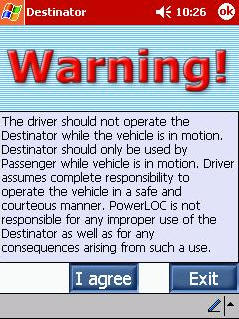 |
This is just a friendly reminder that if you are going to be foolish enough to use the program while you are driving, then it's your own fault when you wreck. |
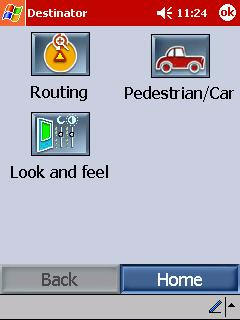
Now is the time to do some setting up.
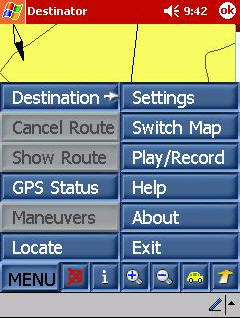 |
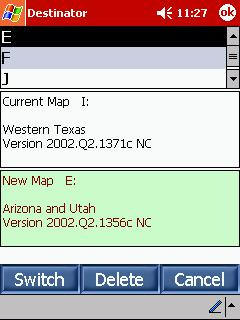
Hitting the Menu button reveals a series of choices.
First you should hit Switch Map to make sure that you are in the
correct area. Once the correct map is selected, your streets will match your
GPS position. Having an incorrect map with a correct GPS position can create
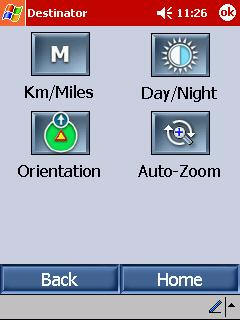
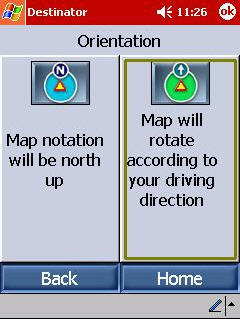
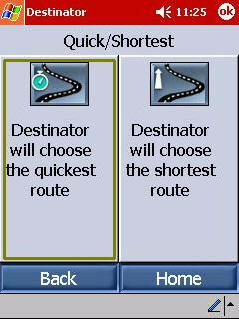
some predictable problems. Next, entering Settings allows you to set up all of your preferences..
|
. |
Here are some of the choices you have, and the screens you will encounter...
After setting up my preferences, I decided to key in my HOME position so that it would always be easy to find my way back from "wherever." To do this, I just hit the Destination button in Menu, and got this screen...
 |
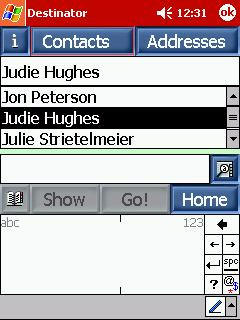
Hitting Contacts allows Destinator to access the
addresses in your Pocket Outlook Contacts file. You choose the contact you want, in this case - myself, and then you hit the Book icon in the bottom left of the screen. This allows you to save the address as a Favorite. I designated mine as Home, and so now I know that I can at least get back from anywhere I have driven to. ☺
|
 |
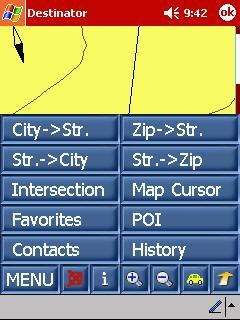
When you have an address that you need help finding, you hit the Destination button, then choose the way that you would like to enter the address. My usual way is by hitting the City -> Street button.
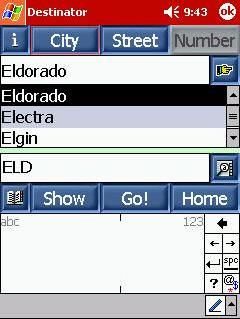 |
After entering the City, you will enter the street, then the
number. It will make your life much easier if you remember that you only
enter the pertinent information for each tab. In other words, don't enter
the house number you are trying to get to while on the Street tab. I
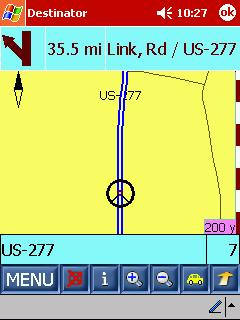
wouldn't mention this if I hadn't learned it the hard way... Once your destination is entered, you hit Go!, and your map will be created - and your route will be clearly marked with a blue and white line...unless you decide you want to use a view that really makes the Destinator software stand out... |
 |
 |
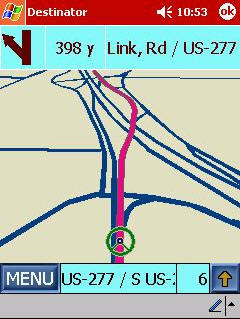
Check it out! 3D trip routing!
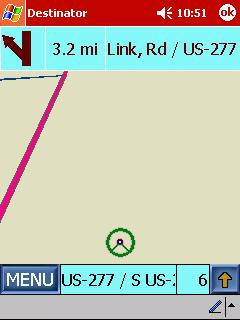
This is easily my favorite view. While it doesn't show you street names, it does offer a block by block view of where you are and where you are going. A convenient red arrow marks the spot when you get to your destination. This view is especially handy when you are in areas that have more than just one simple road. Your route is highlighted in bright red, and your PDA will announce to you when your turns are approaching. |
 |
The Destinator software is easy to use - even for a beginner like me - and it is intuitive. The entries make sense, and the directions are easy to understand. Just a few of the pleasant surprises I have received from the system can be seen in the following screens:
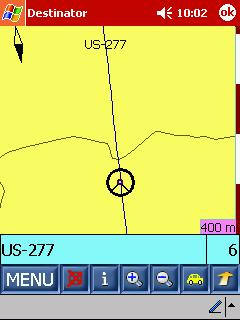 |
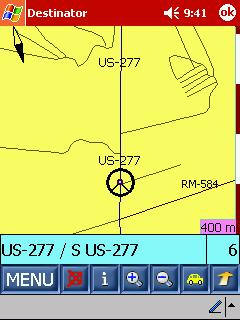
On the left, you can see the highway that crosses the bridge
that straddles my family's ranch. The two lines that cross the highway are
the caliche roads that enter each place. I truly never expected to see our
ranch roads on my iPAQ. WOW! On the right, you can see another rural snapshot. The detail of the roads and even what essentially amounted to people's driveways just amazed me! One more thing that I have been impressed with, is that it seems as if there is almost no lag at all between where I really am and where the GPS says I am. Every now and then, it may lag for just a second or two by what amounts to a couple yards, but it seems to quickly correct itself. I mainly notice it on sharp turns in twisty neighborhoods - and it does not happen all the time. |
 |
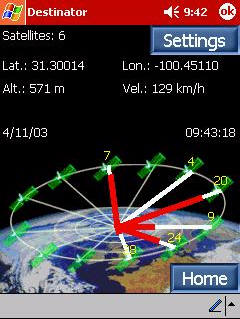 |
I also think that it is quite cool that not only can you see where you are on the map, you can also see where you are in relation to everything. Pushing the GPS Status button shows you how many satellites you are receiving from (in this case, six), as well as your longitude, latitude, velocity and altitude. As you can see, I had accidentally hit the metric button - these items will also display in standard US. |
With that said, there are a couple of little quirks that I have found while using the system over the past couple of weeks. I am not sure exactly what brings them on, and they are not really even annoying enough for me to consider them as cons:
 |
This happened today as I was driving home from the ranch.
All of a sudden, according to my iPAQ, I was driving in someone's
pasture...but I wasn't! After about a hundred yards or so, I was "back on
the road."
Another little glitch I have seen is that every now and then I will hit a dead spot - usually on the highway between San Angelo and Eden. When this happens, the screen will just lock up, and it takes a soft reset before I am back in business. Since it always seems to happen in the same place, I think that it has something to do with the way the satellites must be aligning - maybe I happen to lose one for just a moment or something. |
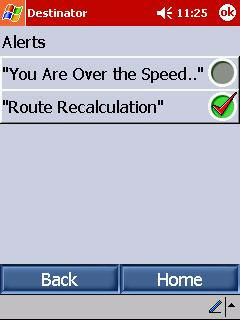 |
One of the Destinator features that I had the most fun with
was the one that made my PDA announce we were going "over the speed limit."
Personally, I think it is amazing that the software knows this! My husband
was going crazy hearing the speed warnings, as he is notorious for his lead
foot.
Unfortunately, the external speaker on the iPAQ 5455 is so lame that it is near impossible to hear the alert voice when the radio is on. |
After using the Destinator Personal Navigation System with the ProClip Vehicle Mount for the last couple of weeks, I can tell you that I am now a GPS Junkie! I am going to have to add a product such as the irock! so that I can actually hear the directions over my stereo speakers, though. Of course, the big "gotcha" with that idea is that I will not be able to listen to the radio at the same time...ah well. It's always something, right?
Prices: $329 for the Destinator Personal Navigation
System, $49.95 for the ProClip cradle, and $29.95 for the ProClip dashboard
mounting plate
Add $250 - $700 for the PDA to use with it
Pros:
Less expensive than a factory GPS system
Can be moved from vehicle to vehicle
Maps are highly accurate
GPS is real time with little to no lag
ProClip is sturdy and swivels for easy passenger viewing
ProClip is made for your PDA and vehicle, and fits interior accordingly
Cons:
It's still expensive - but then, that is relative isn't it?
| Let us know your
comments
on this review and read what others have to say. Back to Main Page. |